
Company runbook
For the person setting the company up — the master user, and the admin afterwards. Follow it top to bottom to go from an approved company email to a fleet and a team ready to work. Your colleagues’ side of this is the User runbook.
Every stage here is done once, by whoever owns the company account. When it is finished, your colleagues join and do the everyday work through the User runbook — writing assessments and exporting reports, which you can do the same way. Take the PDF aboard if you want it to hand without a connection.
| Stage | Who | Once or repeated |
|---|---|---|
| 1. Company onboarding | Master user | Once |
| 2. Sign in | Master user | Once |
| 3. Risk matrix configuration | Company admin | Once, then rarely |
| 4. Vessel onboarding | Company admin | Once per vessel |
| 5. Approve your team | Company admin | Once per person, then ongoing |
You do not sign your company up yourself. ADRS Marine registers it from your signed agreement, against the master email on that agreement. Everything below is you onboarding against that registration — which is why it begins with your master email rather than an open sign-up form. If your company is not on the register yet, the email will not be recognised in Stage 1, and the screen offers a way to reach us.
Stage 1 — Company onboarding
The screen is titled Company Onboarding. Only one person does this: the master user. Everyone else joins afterwards by naming the company — that is the User runbook, not this one.
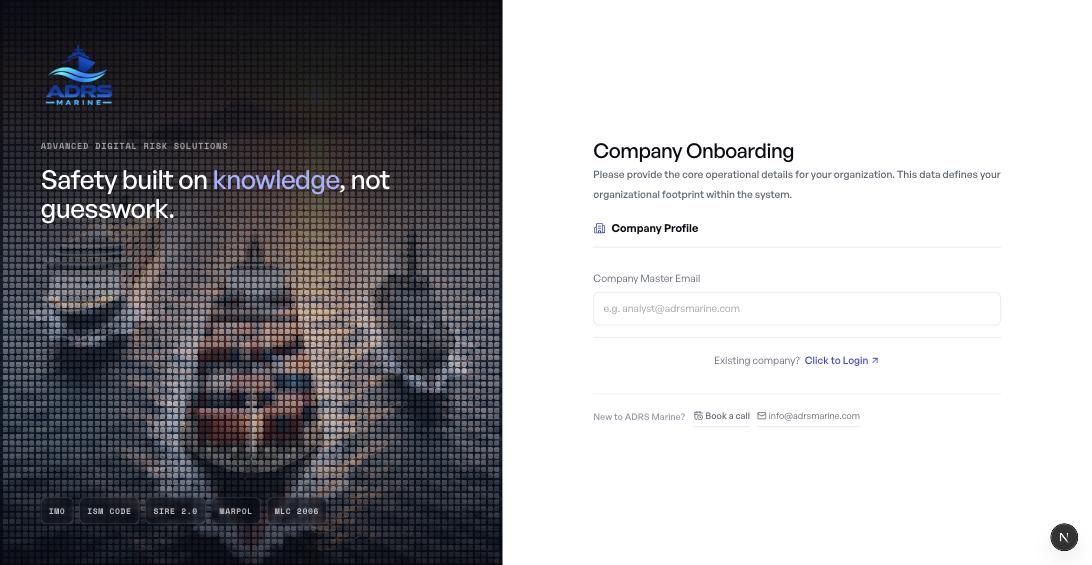
- Open the platform and choose Click to OnboardFrom the sign-in screen, below the Log In button.
- Enter your company master emailThis is the address ADRS Marine holds on your agreement. Nothing else is asked for until it is recognised.
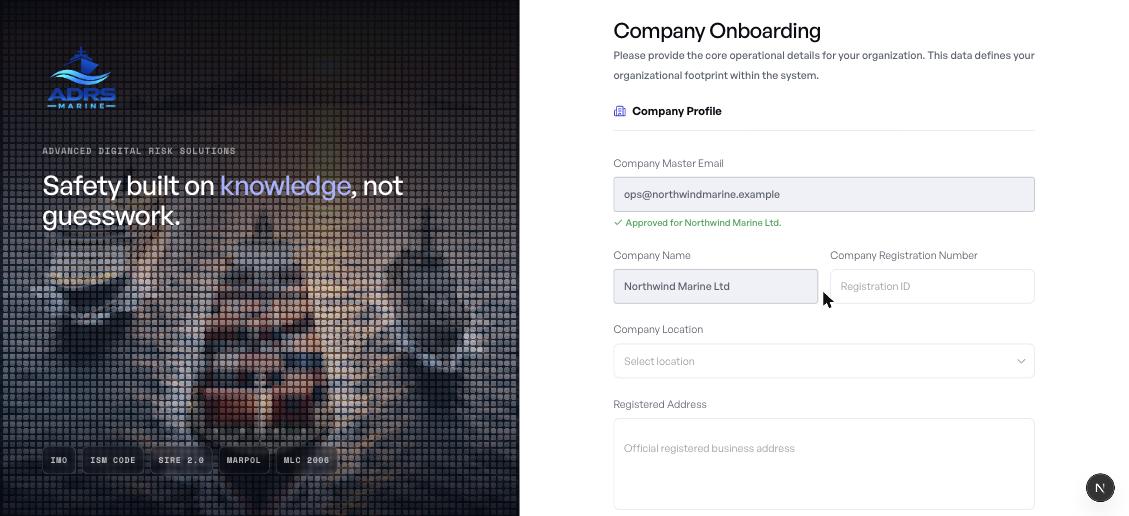
- Wait for the green confirmationApproved for [your company] means you are on the register. The company name fills in automatically and is locked — it is the name on your agreement and will appear on every report you export.
You will be told it is not approved for onboarding yet. That usually means the agreement is not in place, a different address was registered, or there is a typo. The screen offers a way to book a call, which resolves it fastest.
- Complete the remaining fieldsCompany registration number, location, and registered address. Upload a logo if you have one — it appears on every exported report, and a square mark reproduces best.
- Set your master credentialsScroll to Security Credentials and choose the master user ID and password. Keep these safe: this account configures everything else.
- SubmitYour company workspace is created and you can sign in.
Stage 2 — Sign in
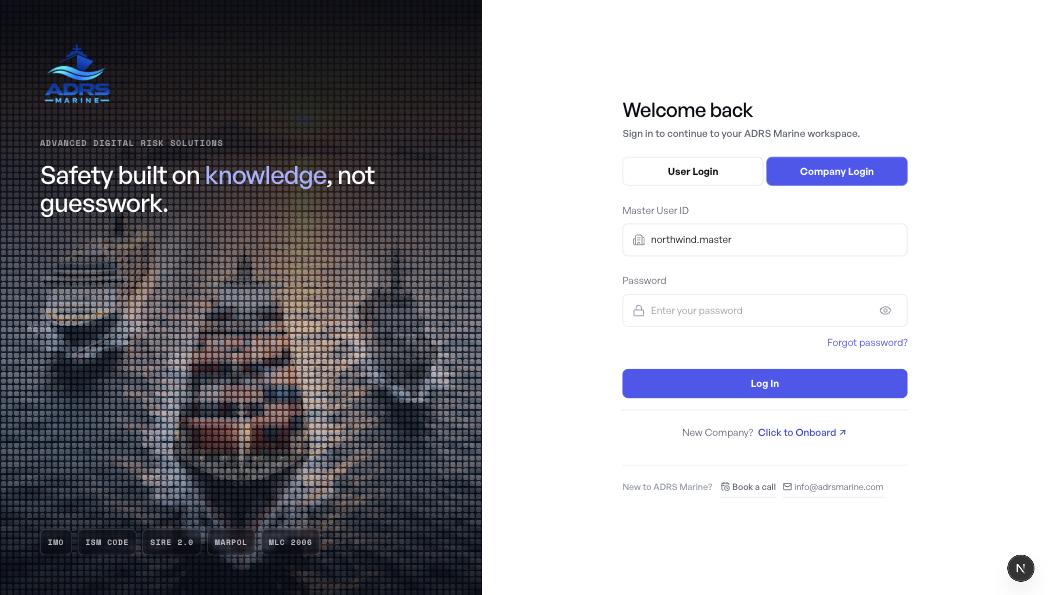
You want the Company Login tab — the one for the master account you just created. Your colleagues use the other tab, User Login, once you have approved them.
| Use this tab | If you are | It asks you for |
|---|---|---|
| Company Login | The master user, signing in to the company account you created in stage 1. | Master User ID |
| User Login | A team member, signing in to their own account after you approved it. | Email ID |
The quickest way to tell you are on the right tab is the first field: Company Login asks for a Master User ID, User Login asks for an Email ID.
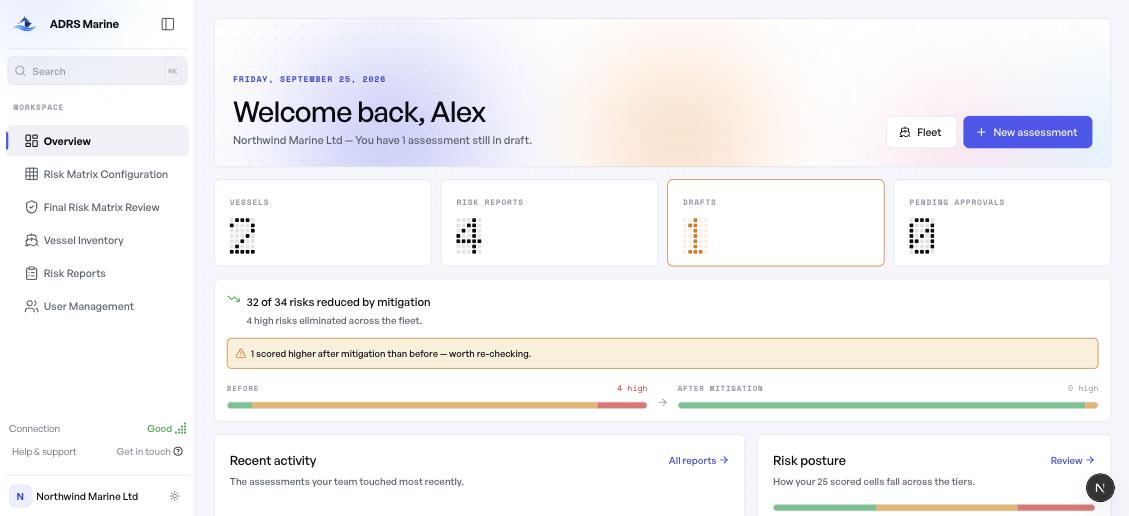
After signing in you land on the overview. Yours will be empty at this point — the screenshot below is a workspace already in use, so you can see what the figures mean once stages 3 to 5 are done.
Stage 3 — Risk matrix configuration
No assessment can be scored until the matrix exists, because a score has no meaning without the scale behind it. Company admin only.
- Open Risk Matrix ConfigurationFrom the sidebar.
- Choose a matrix size5×5 is the industry standard. 4×4 suits a localised operation; 8×8 is for fine-grained audits.
- Define what each severity level meansThe Functional Consequence Configuration grid. For each level, describe the real outcome in concrete terms across the categories that matter to your operation — injury, vessel damage, environmental release, reputation, business impact, regulatory standing. Use Columns count above the grid to add or remove categories.
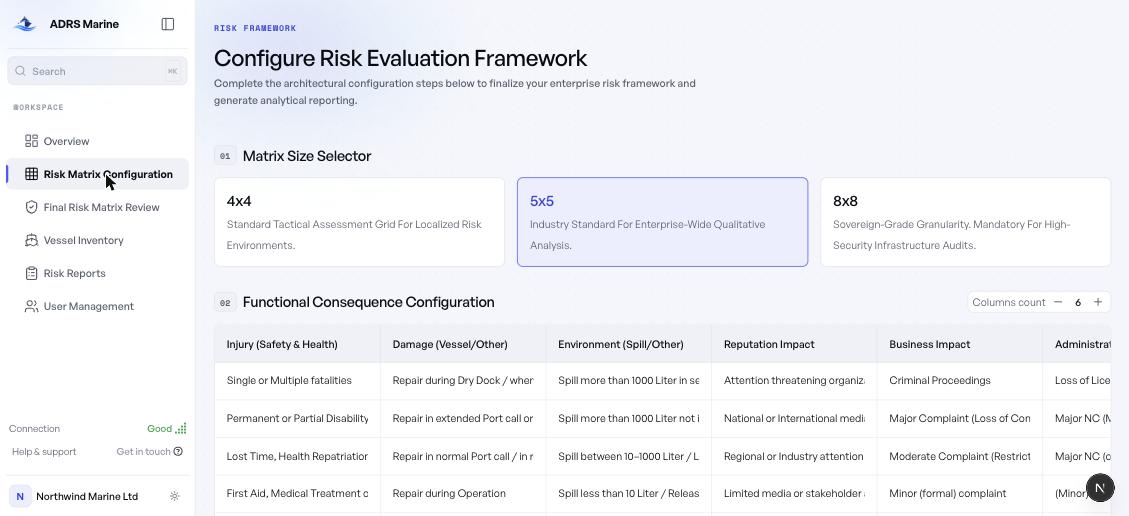
These definitions are what make two assessors score the same job the same way. Without them, one person’s “Major” is another’s “Medium”.
- Check the severity and likelihood labelsBoth scales must run in the same direction: level 1 the least severe and the least likely, level 5 the most. Read the warning below before moving on.
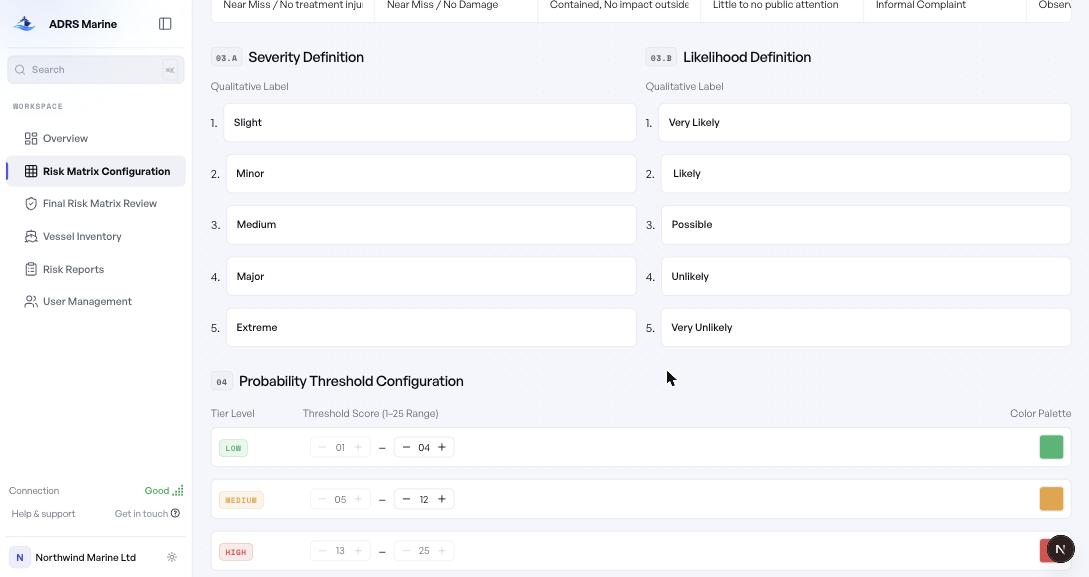
Score is severity × likelihood, so both scales must be numbered in the same direction. If likelihood reads Very Likely at level 1 and Very Unlikely at level 5 while severity runs Slight to Extreme, the matrix is inverted: a severe and very likely event will score lower than the same event judged very unlikely.
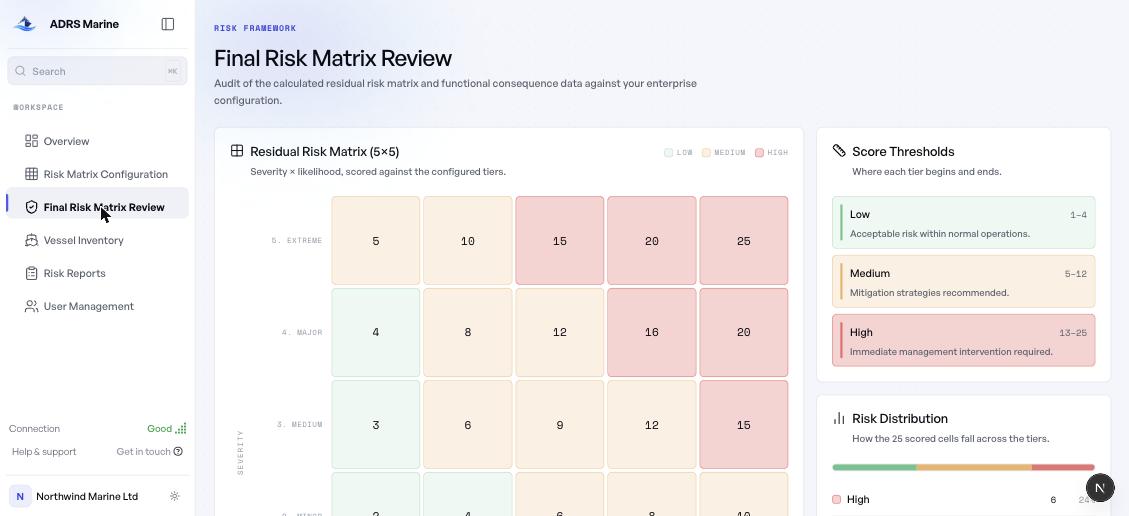
These labels are editable fields. Renumber them so level 1 is the least likely and level 5 the most, then regenerate. Verify on the review screen that the most severe, most likely cell is your highest score.
- Set the score bandsWhere Low becomes Medium, and Medium becomes High. They must be contiguous and cover the whole range the matrix can produce. Pick the tier colours here too.
- Generate the matrixThe button at the bottom right. On an existing matrix it reads Update Matrix.
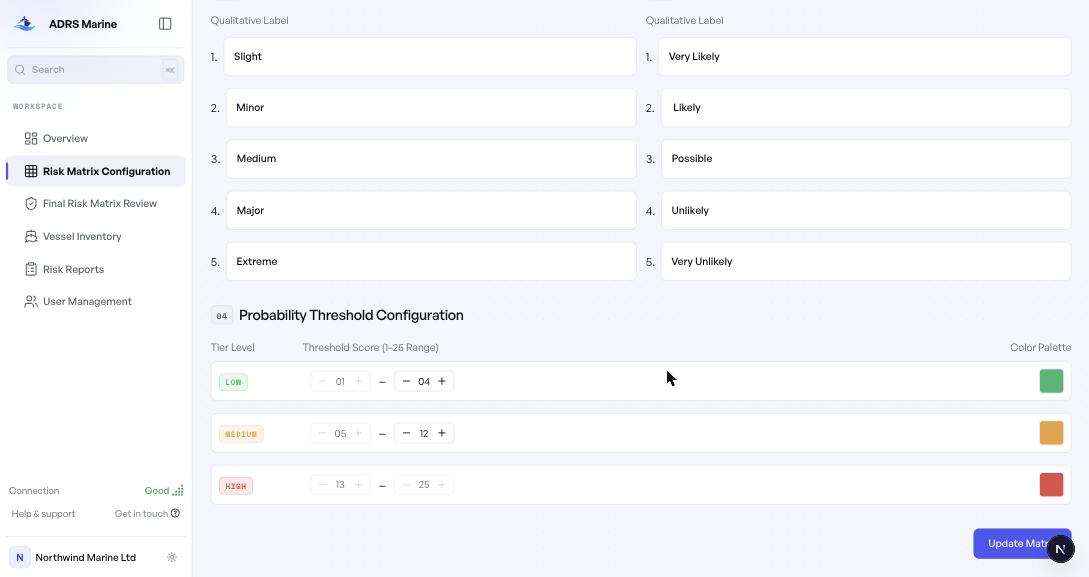
- Review the result before using itOpen Final Risk Matrix Review and read the grid. Check the corners: the most severe and most likely combination must be your highest score, and must sit in the High tier.
Stage 4 — Vessel onboarding
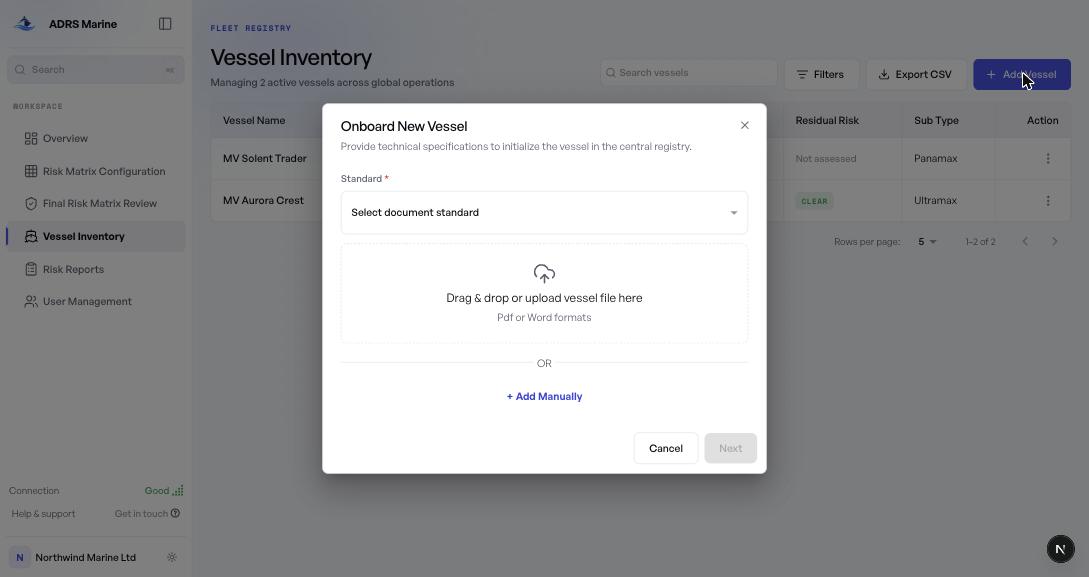
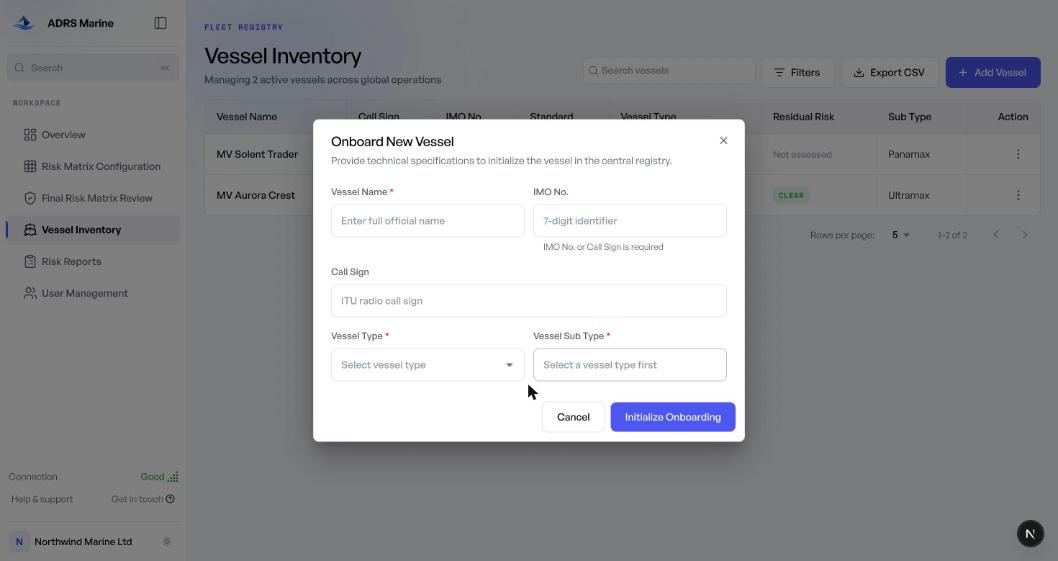
The dialog is titled Onboard New Vessel. Every assessment belongs to a vessel, so the fleet comes before the first job. Company admin only.
- Open Vessel Inventory and choose Add Vessel
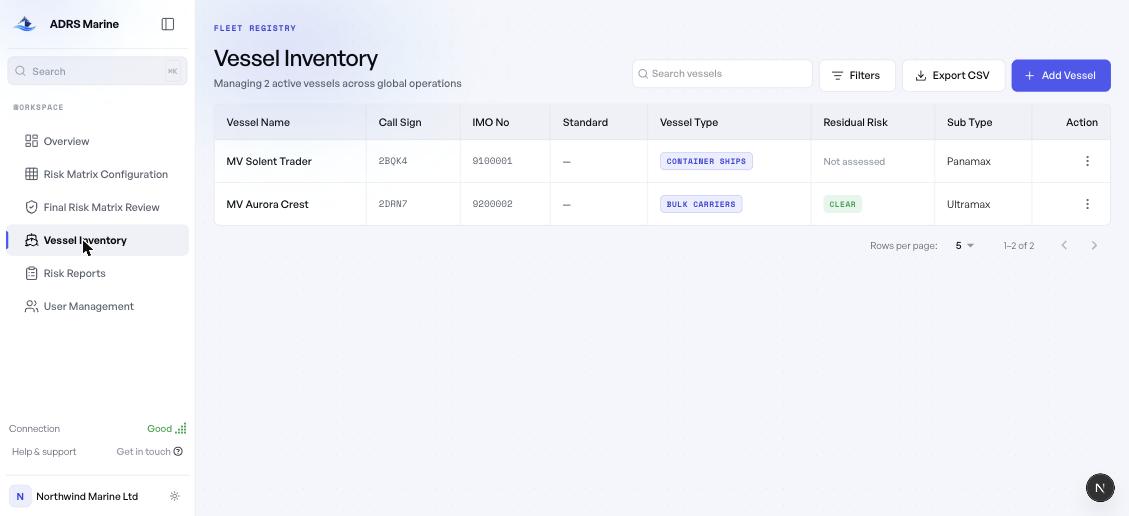
- Pick a document standardThree are supported: Q88, OVPQ and VPQ. It is required if you are uploading a document, and must be set before you upload, because it tells the platform how to read the file. Adding a vessel by hand does not need it — that is why vessels entered manually show a dash in the fleet list’s Standard column.
- Either upload the vessel document, or add it by handDrag in the questionnaire and let the platform read it, or choose + Add Manually and type the details yourself.
What the upload accepts, and what it fills in
Accepted formats are PDF and Word — .pdf, .doc and .docx. The platform reads the questionnaire and fills the vessel record from it, so most of the form is completed for you:
| Group | Fields it extracts |
|---|---|
| Ship identity | Vessel name, IMO number, call sign, flag, port of registry, year built, ship type and sub-type, owner, operator, manager |
| Engineering | Deadweight, gross tonnage, net tonnage, length overall, beam, draft, engine model and type, rated power, maximum speed |
Extraction is only as good as the document. A scanned or non-standard questionnaire may leave fields blank or mis-read them, and anything missing can be typed in. The vessel name plus an IMO number or call sign are what the record cannot be saved without.
- Fill in the identifying detailsVessel name and type are required. For the identifier you need either an IMO number or a call sign — not both. Sub-type is required and is used to tailor hazard suggestions later.
- Choose Initialize OnboardingThe vessel joins the fleet registry.
Repeat for each vessel. The list shows residual risk per hull, so you can scan the fleet for the ship that needs attention.
Stage 5 — Approve your team
Access to your company is yours to grant. Your colleagues register themselves first, through the User runbook — but nobody gains access until you approve them. Every new account arrives as Pending and stays locked out until you act on it.
A person who has registered cannot sign in, see a single assessment, or do anything at all until you approve them in User Management. If a colleague says they are stuck at a Pending screen, this is the step they are waiting on.
- Open User ManagementPending requests are counted at the top.
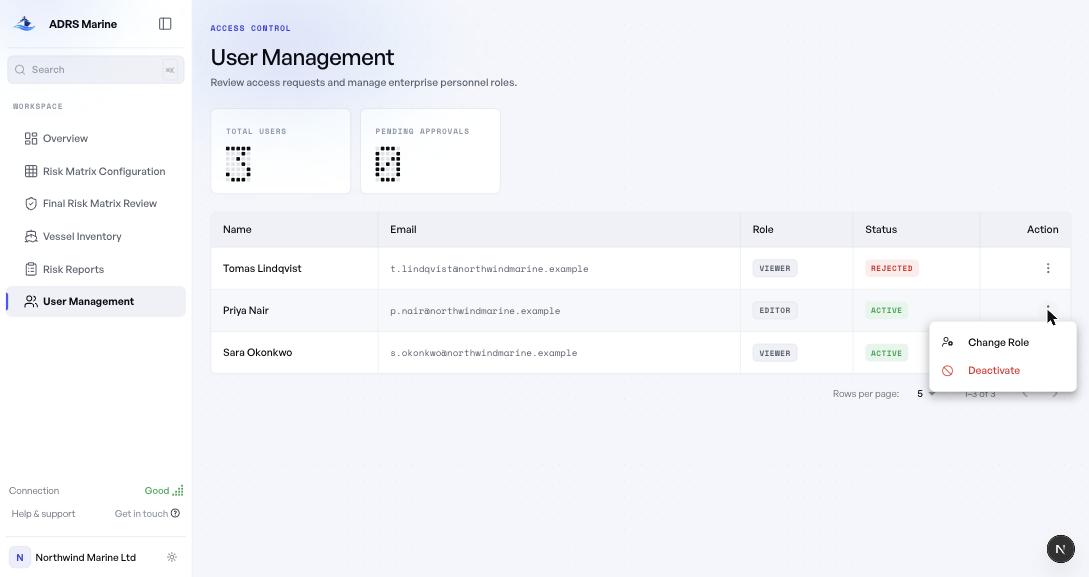
- Open the row menu for the pending personChoose Approve, or Reject if you do not recognise them. Rejecting asks for a reason, which is kept with the record.
- Set their roleChange Role switches between Editor and Viewer.
| Their status | Menu offers |
|---|---|
| Pending | Change Role, Approve, Reject |
| Active | Change Role, Deactivate |
| Rejected or Not Active | Change Role, Activate |
A rejected or deactivated account can be activated again later from the same menu.
Roles decide which screens exist for that person at all — see Team & access for the full matrix. In short: an Editor writes assessments; a Viewer only reads them; neither can see the vessel inventory, the matrix or user management.
Your company is ready
The matrix exists, the fleet is registered, and your team can sign in. From here the day-to-day work — creating a risk assessment and exporting the report — is the same for you as for everyone else, and it lives in the User runbook. Point your colleagues there.
Stages 3 to 5 only come back when your risk policy changes, a vessel joins the fleet, or someone joins the team. If something does not behave as described, Troubleshooting covers the known issues and what to check first.